As the main page of this blog mentioned, I was hired by a local General Contractor in Anderson, South Carolina to remodel an existing 1950's era Master Bathroom. The original tile and associated wire lathe and mud substrate (Mud walls and mud floors) was in near perfect original condition. However, the bathtub had proved to be less manageable due to the owners age. This is a short photo commentary of the process I used to convert an existing bathtub into a typical walk in shower with a curb. In addition to the associated complications of the removal of a 60 year old bathtub, mud work and a discontinued matching tile finish, the owner wants to keep as much of the existing bathroom tile finish as possible, while still creating a presentation that affords continuity and doesn't look as though someone hacked it up with a chainsaw. Accessories and additional finishes will include handicap grab bars, a new plumbing valve, shower head and a glass block window.
Ancient plumbing faucets. Fortunately, the remodel budget included a licensed plumber, a new valve, and adjustable shower head.
At some point in the last 60 years, someone had removed the glass enclosure from this bathtub and scarred the tile finish so badly that this vertical vinyl wallpaper strip is actually more attractive than that which it's hiding underneath. |
|
| This photo shows a 60 year old Porcelain over Cast Iron full length bathtub and the mud set hexagon floor tile. The tub weighs at least 300 pounds and other than a few chips and stains, is in surprisingly good condition. With a little cleaning, this bathroom could look just as nice as the day it was installed. The 4x4 hexagon bathroom floor tile was a product of the same defunct manufacturer of the wall tile. |
|
It's pretty impressive that this wood window frame has lasted as long as it has. Irregardless, it's going to be replaced with shiny new glass block. The window opening is not the perfect dimensions for the glass block the owner wants to use. As these glass selection can't be changed (home owner trumps tile man) and these dimensions are fixed, a creative alternative was utilized for the space left over on each side of the glass block field width dimensions |
|
| In this photo the window has been removed and preparations being made to install the glass block. |
|
In this photograph, the Glass Block has been installed and I'm waiting for the mortar to set up so I can touch up and clean any film left on the glass. |
|
In this image, I've removed the tile lath and wall mud so the plumber could have room to replaced the valve.
|
|
In this image, you can get an idea just how rugged a mud wall tile job application really is. It's an ancient and dying art form that very few "tile setters" know anything about anymore. |
|
In this photo, I've removed the bathtub, adjacent tile and substrate, installed the shower pan pre-slope, the shower pan liner, 20# tar paper and wire lathe. The shower is not missing the wood curb frame. It won't have a wood frame curb. I form and solid pour my curbs when I have the ability to do so. Why? It's a better job. |
|
In this photo, the curb has been formed and poured, the wire lath has been scratched coated in preparation for the mud wall float finish. |
|
In this photo, I've installed the 20# roofing tar paper, wire lathe and scratch coat for the valve repair. |  |
In this photo, the curb is formed and poured around the shower pan liner, the wall mud applied plumb and square, the shower floor mud packed, leveled and pitched to the drain and the valve wall repair finished. If you look close, you may be able to see a 3x1/2 inch recess I made in the wall mud at the point where it meets the existing tile. Why? The tumbled stone mosaic listello that will serve as a transition for the existing and new tile finishes is a lot thicker than the tile. This recess will accommodate that difference in thickness. |
|
| It would have taken a total 20 minutes more work and $2.00 worth of copper pipe to have placed this valve in the right place. I didn't install this valve but it reflects poorly on me to be associated with it. Someone paid good money for this.
Anyway... In this photo, I've finished the mud work around the shower valve.
|
|
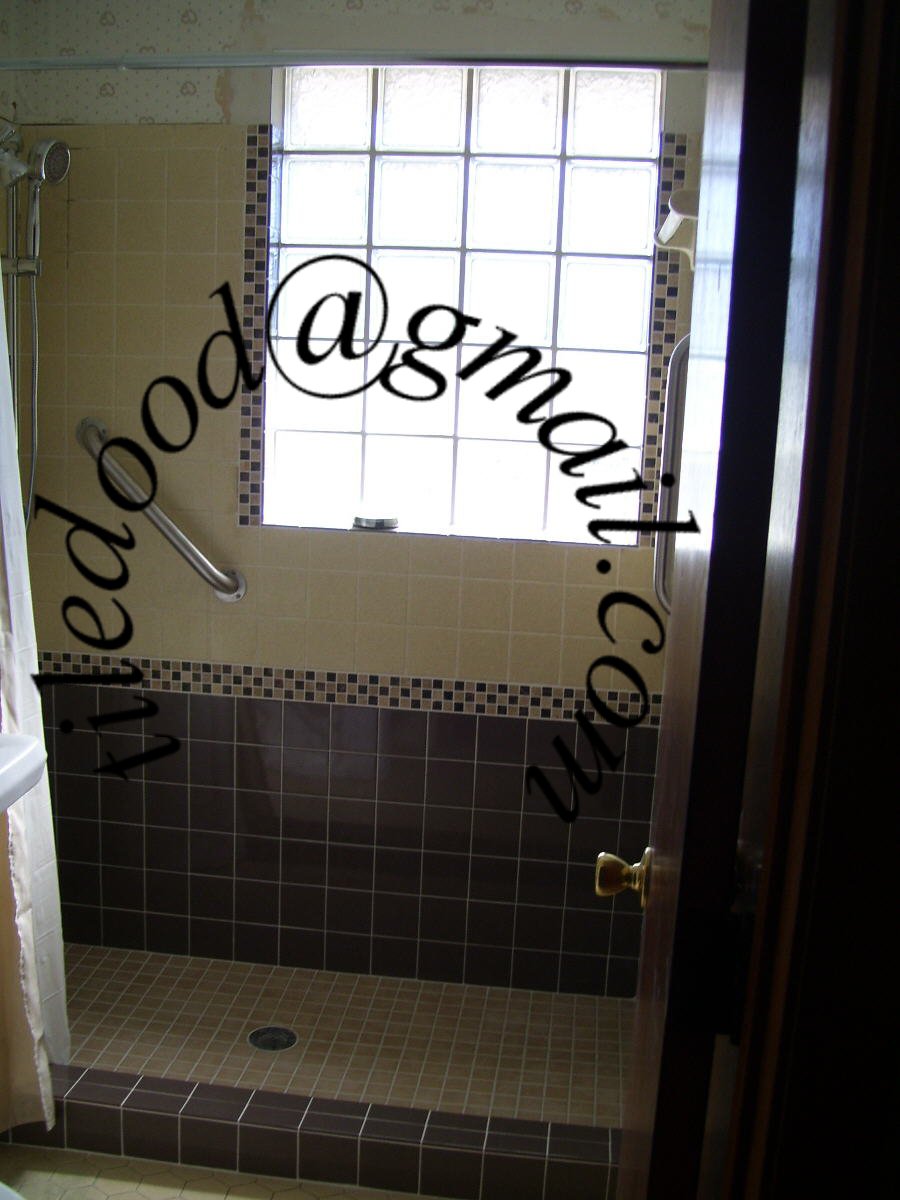
Ta-Dah! And just like that, it's all done. I can't take credit for the color selection, though I'd like to. The two daughters of the elderly home owner picked this ensemble in a matter of an hour at one of the local big box stores. They did extremely well, I think. Considering what they had to work with, this works! |
|
It sure made a difference in this bathroom, didn't it? Absent a exact matching tile, I don't know that the color selection could have been better. |
|
It's a nice job and I'm pretty pleased with my installation. |
|
Though not for everyone, the installed glass block and stainless steel grab bars are nice features. The grabs are indispensable for the elderly or handicapped. |
|
In one of the photograph descriptions above, I mentioned that glass block is a fixed dimension finish. For this window, I was left with roughly 3 1/2 inches that I had to fill on the inside opening. The clients daughters came to the rescue with this idea; A tumbled stone mosaic strip. |
|
It's a pleasing bathroom presentation and is perhaps as good as it could possibly be considering the mandates and available options. |
|
This is the window detail. The remainder of the existing wallpaper has yet to be replaced and the corner wallboard finish is still to be painted. These endeavors were considered to be a fun contribution by the owners daughters and that's what they opted to do. |
|
If you're still reading, thanks!


that looks beautiful.
ReplyDeleteThank you for your kind words!
DeleteFantastic. This is a great alternative to tearing out the good mud set work. The finished job looks fabulous.
ReplyDeleteThank you!
Delete